Disclaimer: This project is intended for ethical, educational, and authorized use only — such as researching your own digital footprint, authorized penetration testing, or security awareness training. Always comply with applicable laws and platform terms of service.
Digital Shadow Agent is a recursive OSINT (Open Source Intelligence) footprinting tool. Given a username or email address, it autonomously:
The key word is recursive. Most OSINT tools are single-pass. This one keeps going, using each round of findings to fuel the next search — just like a real investigator would.
Manual OSINT is tedious. You find a GitHub username, manually check Twitter, find an email in a bio, then search that email, find another alias… It compounds quickly and takes hours.
I wanted to automate that entire investigative loop: discover → harvest → analyse → pivot → repeat.
The challenge was keeping it intelligent enough to not spiral into noise. That’s where the LLM comes in — it acts as the judgement layer, deciding which new leads are actually related to the original target.
| Layer | Tool |
|---|---|
| Agentic Workflow | LangGraph |
| LLM (Local) | Ollama + qwen3:8b |
| Profile Discovery | Maigret |
| Web Search | DuckDuckGo Search (ddgs) |
| HTTP Client | httpx |
| HTML Parsing | BeautifulSoup4 |
| Breach Checking | XposedOrNot API |
| Web UI | Flask + Server-Sent Events |
| Terminal UI | Rich |
Everything runs locally. No external AI API keys required.
The agent follows a directed graph pattern:
START
  │
  ▼
SCOUT ──────────────────────────────────┐
  │                                     │
  ▼                                     │ (recurse if new pivots
HARVESTER                               │  AND iteration < max)
  │                                     │
  ▼                                     │
ANALYST ───────────────────────────────┘
  │
  │ (no more pivots OR max depth reached)
  ▼
DOSSIER
  │
  ▼
 END
The conditional edge after Analyst is the core of the recursive behaviour. If the LLM finds new identities to investigate, the graph loops back to Scout. Otherwise, it falls through to Dossier.
LangGraph passes a shared state dict between every node. The key design challenge was: how do you accumulate data across iterations without duplicating it?
The answer is reducers — custom functions that LangGraph calls when a node tries to update a state field.
# state.py

def _merge_lists(left: list, right: list) -> list:
    """Append new items; no deduplication."""
    return left + right

def _merge_sets(left: set, right: set) -> set:
    """Union two sets — natural deduplication."""
    return left | right

def _merge_demographics(left: dict, right: dict) -> dict:
    """Merge dicts, keeping non-empty values and avoiding overwrites with 'Unknown'."""
    merged = left.copy() if left else {}
    for k, v in right.items():
        old_val = merged.get(k)
        if not old_val or str(old_val).lower() in ["unknown", "none", "n/a"]:
            merged[k] = v
        elif isinstance(old_val, list) and isinstance(v, list):
            merged[k] = list(set(old_val + v))
    return merged
The AgentState TypedDict then uses Annotated to attach these reducers:
class AgentState(TypedDict, total=False):
    seed_input: str
    input_type: Literal["username", "email"]
    current_targets: list[str]

    discovered_profiles: Annotated[list[dict], _merge_lists]
    harvested_data:       Annotated[list[dict], _merge_lists]
    seen_targets:         Annotated[set[str],   _merge_sets]
    demographics:         Annotated[dict,        _merge_demographics]
    # ...
This means every node just returns a partial update dict. LangGraph handles the merging automatically.
The Scout node is responsible for finding where the target exists online.
It runs two strategies in sequence:
Primary: Maigret CLI
Maigret checks a username against 3,000+ sites and outputs a JSON report. I call it as a subprocess and parse the generated report file:
def _run_maigret(username: str) -> list[dict]:
    cmd = [
        sys.executable, "-m", "maigret",
        username,
        "--json", "simple",
        "--timeout", "10",
        "--no-progressbar",
        "--folder", "reports",
    ]
    result = subprocess.run(cmd, capture_output=True, text=True, timeout=180)

    # Find the generated JSON report
    for f in os.listdir("reports"):
        if f.startswith(f"report_{username}") and f.endswith(".json"):
            with open(os.path.join("reports", f)) as fp:
                data = json.load(fp)
            return [p for p in data.get("profiles", []) if p.get("is_found")]
Fallback: Direct HTTP Checks
If Maigret fails, Scout directly requests URLs on major platforms and inspects the response:
platforms = {
    "GitHub": f"https://github.com/{username}",
    "Reddit": f"https://www.reddit.com/user/{username}",
    # ... etc
}

for platform, url in platforms.items():
    resp = client.get(url)
    if resp.status_code == 200 and not any(sig in resp.text[:2000].lower()
                                           for sig in NOT_FOUND_SIGNALS):
        profiles.append({"platform": platform, "url": url, ...})
Profile Validation
Before moving on, each discovered URL is re-validated in parallel using ThreadPoolExecutor. This catches soft 404s (pages that return 200 but show “user not found” text) and also attempts to extract profile images via regex patterns specific to each platform:
# GitHub: avatar URL pattern
match = re.search(r'(https://avatars\.githubusercontent\.com/u/\d+)', html)

# TikTok: CDN pattern
match = re.search(r'(https://p16-common-sign\.tiktokcdn[^"\'\s>]+)', html)
Relevance Scoring
Each profile gets a relevance score (0.0–1.0) based on how closely its username/URL matches the original target. This prevents noise from being processed further downstream:
def _score_profile(profile: dict, target: str) -> float:
    score = 0.0
    if profile["username"].lower() == target.lower():
        score += 0.8
    if target.lower() in profile["url"].lower():
        score += 0.3
    return min(1.0, score)
Breach Checking
If the target is an email address, Scout also queries the XposedOrNot API to check for known data breaches:
def _check_breaches(email: str) -> list[str]:
    resp = httpx.get(f"https://api.xposedornot.com/v1/check-email/{email}")
    # Parse the response and extract breach names
Once profiles are found, the Harvester scrapes each one for intelligence.
It uses BeautifulSoup to extract structured data from HTML:
def _extract_from_html(html: str, base_url: str) -> dict:
    soup = BeautifulSoup(html, "html.parser")

    # Remove noise
    for tag in soup(["script", "style", "noscript"]):
        tag.decompose()

    text = soup.get_text(separator=" ", strip=True)

    # Bio: try meta description, og:description, or first <p>
    bio = (soup.find("meta", {"name": "description"}) or {}).get("content", "")

    # Extract emails with regex
    emails = EMAIL_RE.findall(text)

    # Extract @mentions
    usernames = USERNAME_RE.findall(text)

    # Collect outbound links
    external_links = [
        a["href"] for a in soup.find_all("a", href=True)
        if a["href"].startswith("http") and base_domain not in a["href"]
    ]

    return {"bio": bio, "emails_found": emails, "usernames_found": usernames, ...}
Anti-bot Courtesy
The Harvester adds a random jitter delay between requests (1.5–3.5 seconds) and rotates User-Agent headers per platform. This isn’t about evasion — it’s about being a respectful scraper and not hammering servers.
DuckDuckGo Search
After scraping profiles directly, it also runs DuckDuckGo searches for each target and scrapes those result pages too, widening the intelligence net:
with DDGS() as ddgs:
    for r in ddgs.text(f'"{target}" social profile', max_results=5):
        # Scrape the result URL as well
This is the brain of the agent. The Analyst sends all harvested data to a local Ollama LLM, which returns structured JSON containing:
The System Prompt
You are an expert OSINT analyst. Your job is to examine harvested intelligence
data from online profiles and extract:

1. New usernames or aliases the target might use on other platforms.
2. New email addresses associated with the target.
3. Key observations — notable findings.
4. Target Demographic Intelligence: Name, Age (guess from career/education),
   Sex, Race/Ethnicity, Phone Numbers, LinkedIn Profiles.

Rules:
- ONLY include intelligence that belongs to the PRIMARY target.
- If data belongs to a DIFFERENT person, DISCARD IT.
- Return valid JSON only.
Pivot Filtering
A critical piece of logic: the LLM might hallucinate or include irrelevant results. So new pivots are filtered against an identity-match function before being accepted:
def _simple_identity_match(handle: str, target: str) -> bool:
    """Only accept pivots that share a 3-char prefix with the original target."""
    h = handle.lower().replace(".", "").replace("_", "")
    t = target.lower().replace(" ", "")
    if h[:3] != t[:3]:
        return False
    return t in h or h in t
This prevents the agent from going off on tangents and investigating unrelated people.
Demographic Locking
Same logic applies to demographic data. If the LLM extracts a name that doesn’t match our target, those demographics are discarded:
if extracted_name and not _simple_identity_match(extracted_name, primary_target):
    # Discard — this is someone else's data
    locked_demographics = {}
The final node compiles everything into a structured Markdown report and writes it to disk:
dossier_parts = [
    "# Intelligence Dossier",
    f"**Target:** `{seed}` ({input_type})",
    f"**Generated:**{timestamp}",
    "## Summary Statistics",
    f"| Profiles discovered |{len(profiles)} |",
    # ... all sections from every iteration
]

filename = f"dossier_{safe_seed}_{date_str}.md"
with open(filepath, "w") as f:
    f.write("\n".join(dossier_parts))
Because dossier_sections in the state accumulates one section per node per iteration, the final report naturally tells the story of the whole investigation chronologically.
The graph is defined in graph.py. The key part is the conditional edge after Analyst:
def _should_recurse(state: dict) -> str:
    pivots = state.get("pivots", [])
    iteration = state.get("iteration", 0)
    max_iter = state.get("max_iterations", 3)

    if pivots and iteration < max_iter:
        return "scout"   # Loop back
    else:
        return "dossier" # Finish up

graph = StateGraph(AgentState)
graph.add_node("scout",     scout_node)
graph.add_node("harvester", harvester_node)
graph.add_node("analyst",   analyst_node)
graph.add_node("dossier",   dossier_node)

graph.set_entry_point("scout")
graph.add_edge("scout", "harvester")
graph.add_edge("harvester", "analyst")
graph.add_conditional_edges("analyst", _should_recurse, {
    "scout":   "scout",
    "dossier": "dossier",
})
graph.add_edge("dossier", END)

compiled = graph.compile()
Running the agent is then just:
initial_state = make_initial_state(target="johndoe", input_type="username")
final_state = compiled.invoke(initial_state)
LangGraph handles all the state merging, edge routing, and iteration tracking.
Beyond the CLI, I built a Flask web server (web_server.py) that exposes the agent over HTTP with a real-time UI using Server-Sent Events (SSE).
The frontend starts an investigation via a POST request, then opens an EventSource stream to receive live updates:
POST /api/investigate  → starts the agent in a background thread
GET  /api/stream/<id>  → SSE stream of log messages, profiles, progress
GET  /api/result/<id>  → final dossier JSON when done
Each node pushes events onto a per-investigation queue.Queue. The SSE endpoint reads from that queue and streams events to the browser as they happen. This gives the UI live feedback without polling.
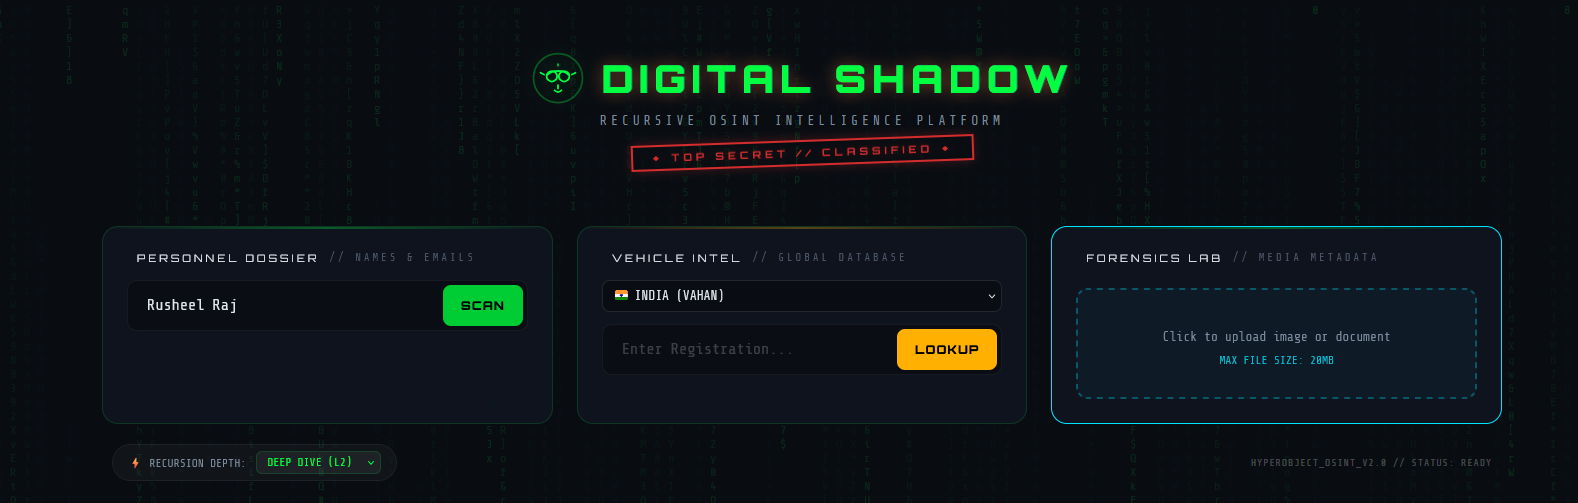
The best way to understand what this tool does is to see it in action. I ran it on myself — Rusheel Raj — to map out my own public digital footprint. Here’s exactly what it found.
Digital Shadow Agent — Main Dashboard
The UI is split into three independent investigation modes, all accessible from a single dashboard:
SCAN. The agent begins its recursive loop: Scout → Harvester → Analyst → repeat until all leads are exhausted.LOOKUP.The bottom bar shows the current Recursion Depth setting (DEEP DIVE L2 = 2 iterations) and the system status. All three modules run independently — you don’t need to run a full OSINT scan to use the Forensics Lab.
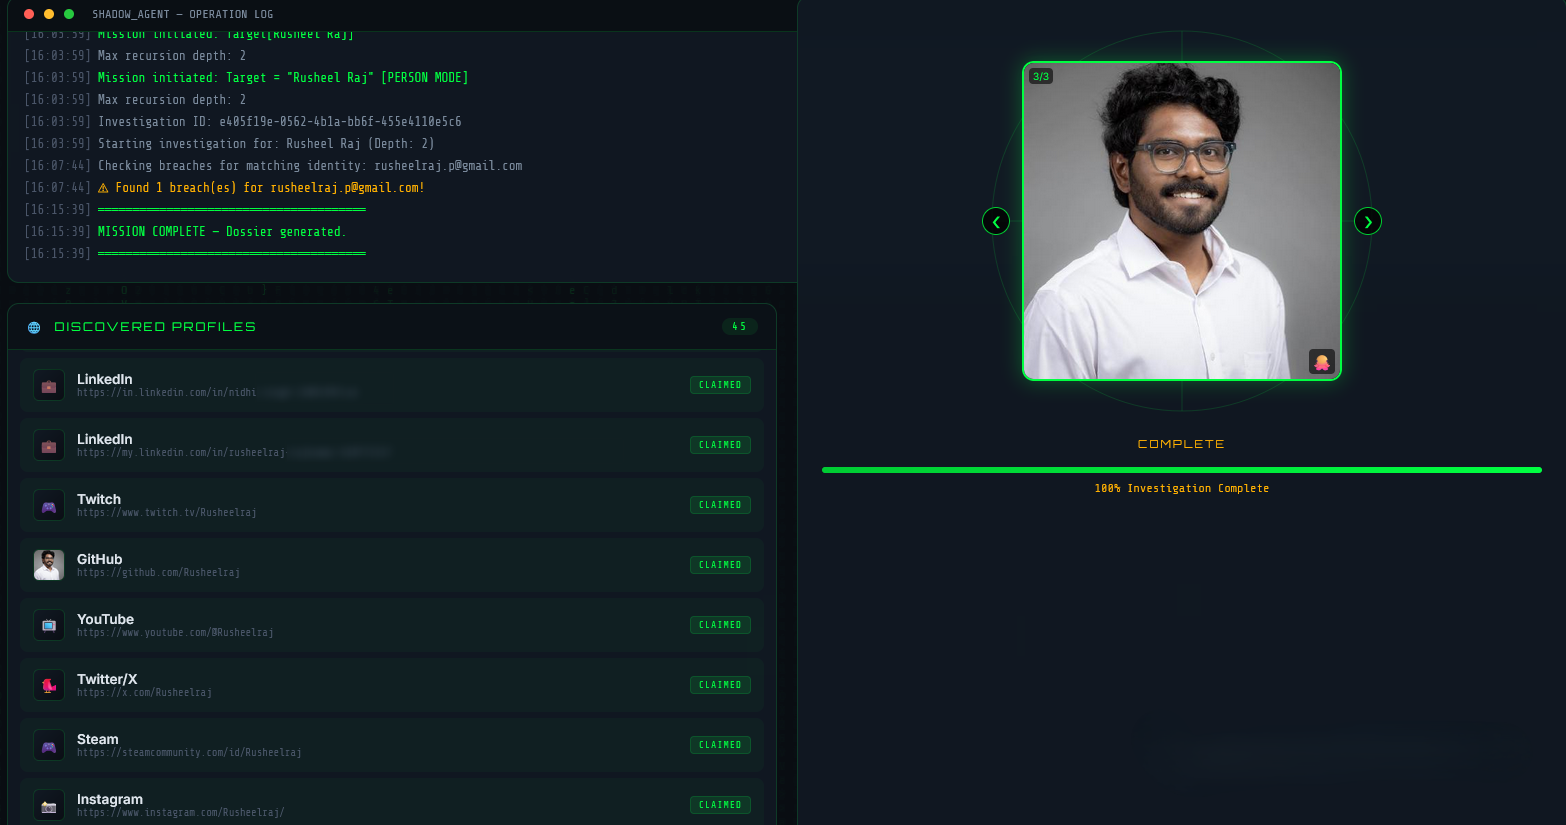
Operation Log and Discovered Profiles
Once a scan is started, the left panel becomes a live Operation Log — a real-time stream of every action the agent takes, timestamped to the second:
[16:03:59] Mission initiated. Target: Rusheel Raj
[16:03:59] Max recursion depth: 2
[16:07:44] Checking breaches for matching identity: rusheelraj.p@gmail.com
[16:07:44] ⚠ Found 1 breach(es) for rusheelraj.p@gmail.com!
[16:15:39] MISSION COMPLETE — Dossier generated.
This is powered by Server-Sent Events (SSE) — each node pushes log events into a queue as it runs, and the browser receives them live without polling.
On the right, a Profile Image Carousel displays photos collected from discovered profiles. In this run it found 3 images (3/3) pulled from different platforms — shown cycling through automatically.
Below, the Discovered Profiles panel lists every claimed account found — 45 profiles in total for my name. Each entry shows the platform, the direct URL, and its status (CLAIMED / AVAILABLE). Platforms found in this run included LinkedIn, Twitch, GitHub, YouTube, Twitter/X, Steam, and Instagram — all verified as active.
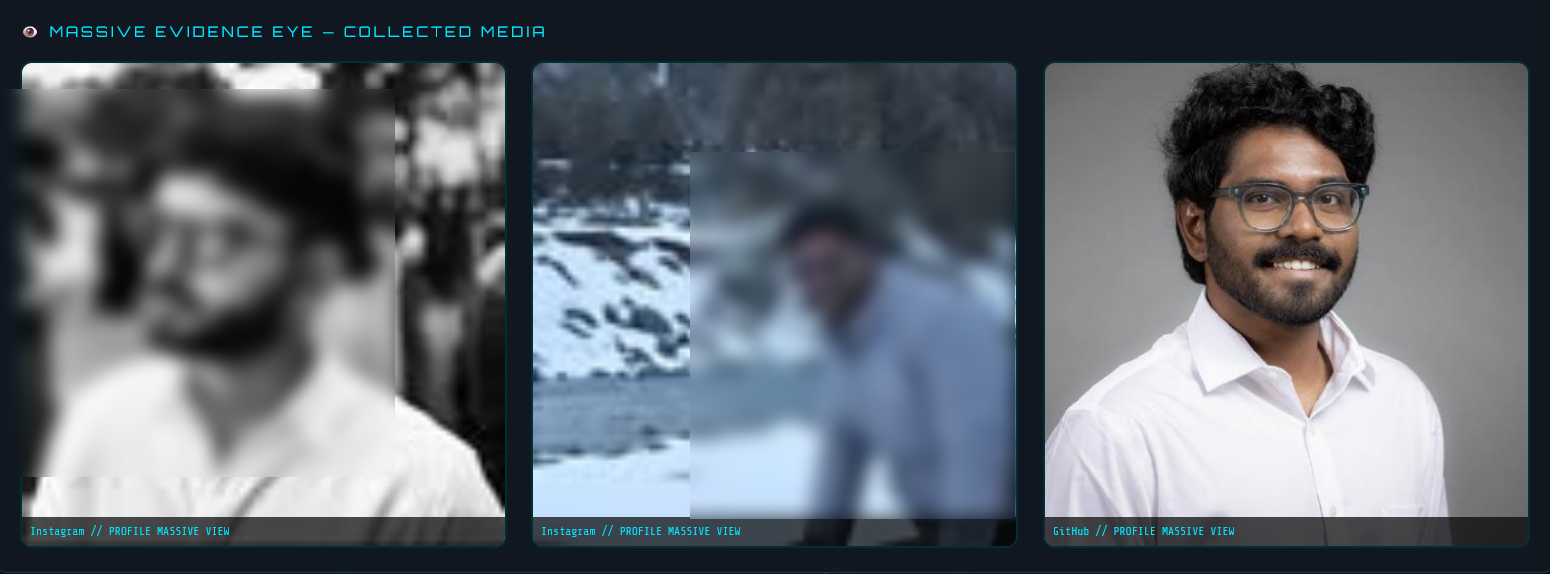
Massive Evidence Eye — Collected Media
The Massive Evidence Eye section aggregates all profile images harvested from across platforms into a single visual gallery. Each image is labelled with its source platform and view type.
In my scan, three images were collected:
- Instagram — a black and white side profile photo
- Instagram — a candid photo from a snow trip
- GitHub — my professional headshot in a white shirt
This is built by the Harvester node, which looks for og:image meta tags and platform-specific avatar CDN patterns in the scraped HTML. The fact that three photos from two different platforms were linked to the same identity demonstrates how consistent usernames across platforms make cross-referencing trivial.
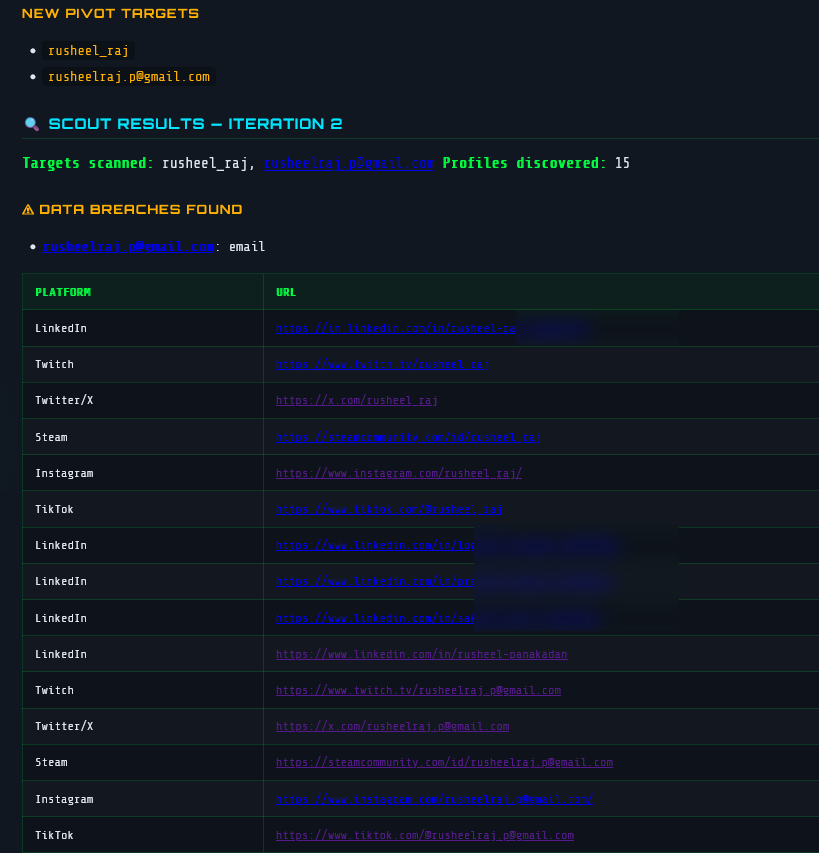
Pivot Targets and Scout Results — Iteration 2
This screenshot shows the agent mid-investigation at Iteration 2 — after the first pass found my primary profiles, the Analyst node extracted two new pivot targets:
rusheel_raj — a username variant discovered in scraped page datarusheelraj.p@gmail.com — an email address found in a profile bioThese become the new seed targets for the next Scout pass. The Scout then scans those identifiers across platforms — finding 15 additional profiles in iteration 2 alone.
The breach detection module also triggered: rusheelraj.p@gmail.com was found in 1 known data breach (flagged in orange), queried live against the XposedOrNot API.
The profiles table shows the recursive harvest in action — the same email address appearing across LinkedIn, Twitch, Twitter/X, Steam, Instagram, and TikTok, all with claimed status. This is exactly the snowball effect the recursive architecture is designed to exploit: one email unlocks a second wave of platform accounts.
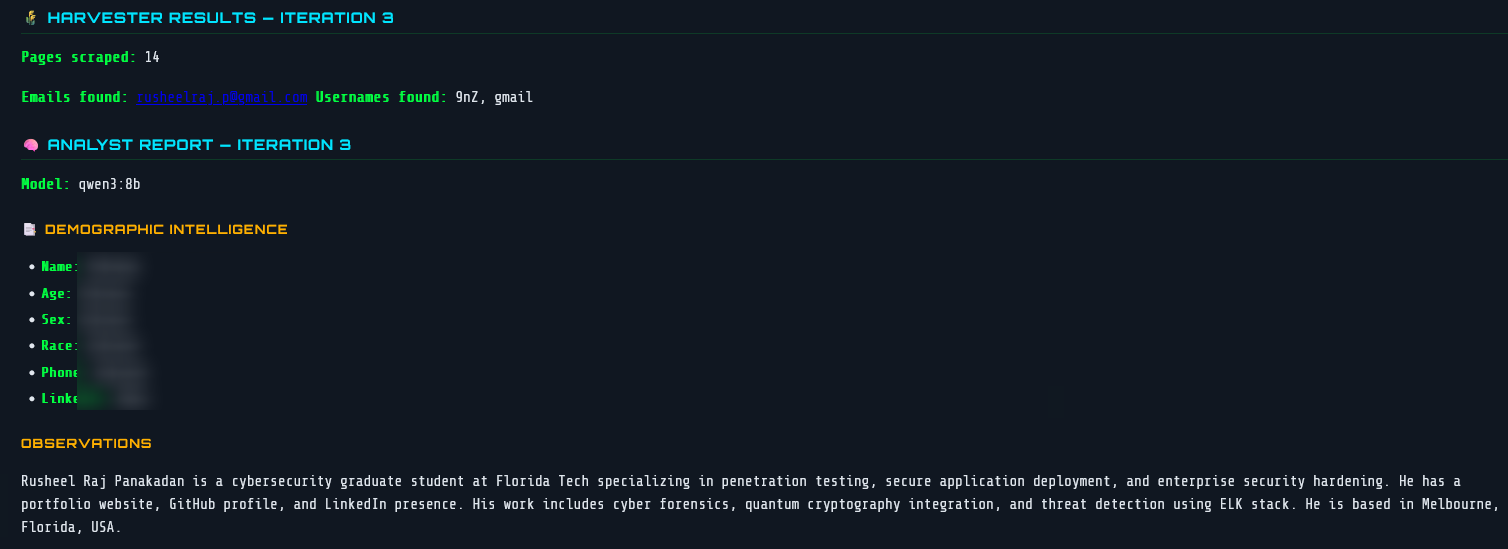
Analyst Report — Iteration 3 with LLM Observations
After the Harvester scrapes 14 pages in Iteration 3, the raw data is passed to qwen3:8b running locally via Ollama. The Analyst node returns a structured report with two parts:
Demographic Intelligence — structured fields the LLM attempts to populate from scraped text. In this run most fields were Unknown because the pages didn’t contain explicit personal details, which is the correct behaviour — the model doesn’t hallucinate.
Observations — a free-text summary of what the LLM actually found and inferred:
“Rusheel Raj Panakadan is a cybersecurity graduate student at Florida Tech specialising in penetration testing, secure application deployment, and enterprise security hardening. He has a portfolio website, GitHub profile, and LinkedIn presence. His work includes cyber forensics, quantum cryptography integration, and threat detection using ELK stack. He is based in Melbourne, Florida, USA.”
This was generated entirely from scraped public page text — no manual input. The LLM correctly identified my university, field of study, technical specialisations, and location purely from what’s publicly visible across my profiles.
The qwen3:8b model label is visible in the report header, confirming it’s running fully locally with no external API calls.
Beyond usernames and emails, the agent has a dedicated Vehicle Intelligence node — a specialized lookup engine for vehicle registration data from public records.
The vehicle_node is triggered separately from the main OSINT graph. You supply a vehicle registration (plate) number and a region, and it routes to the appropriate data source:
Vehicle Plate Input
        │
        ├── Region: IN ──▶ vahanx.in  (India RTO records)
        └── Region: US ──▶ findbyplate.com (USA NHTSA/VIN data)
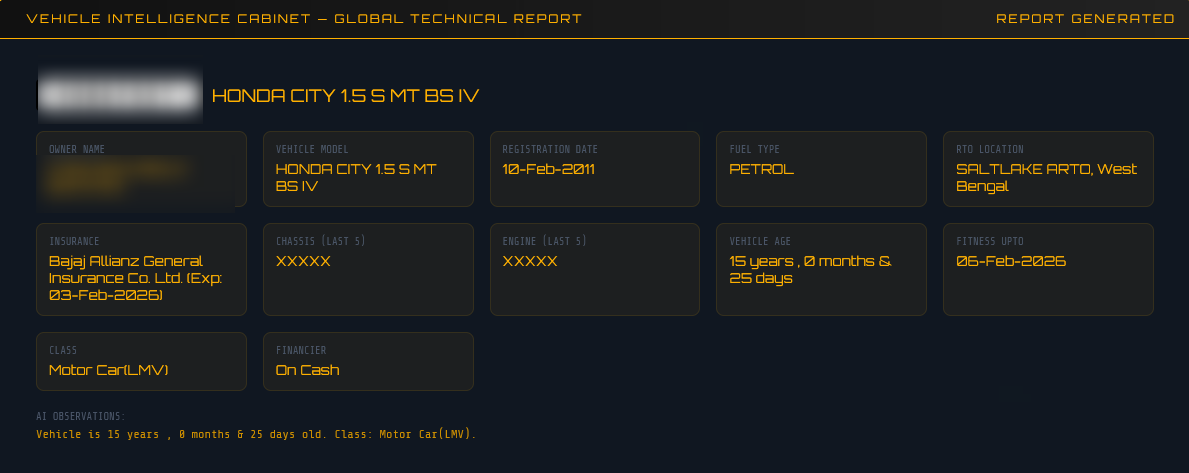
For Indian plates, the node scrapes the public portal and extracts a comprehensive record:
| Field | Example |
|---|---|
| Owner Name | Rahul Sharma |
| Vehicle Model | Maruti Suzuki Swift |
| Registration Number | MH12AB1234 |
| Registration Date | 2019-03-15 |
| Fuel Type | Petrol |
| RTO Location | Pune, Maharashtra |
| Insurance Company | HDFC ERGO (Exp: 2026-03-14) |
| Chassis / Engine (last 5) | X1234 / Y5678 |
| Vehicle Age | 5 Years |
| Fitness Valid Until | 2034-03-14 |
| Vehicle Class | Motor Car |
| Financier | HDFC Bank |
The parser targets the specific CSS structure of VahanX’s card layout (div.hrcd-cardbody, div.col-sm-6.mb-4), pulling both the summary cards and the detailed grid fields.
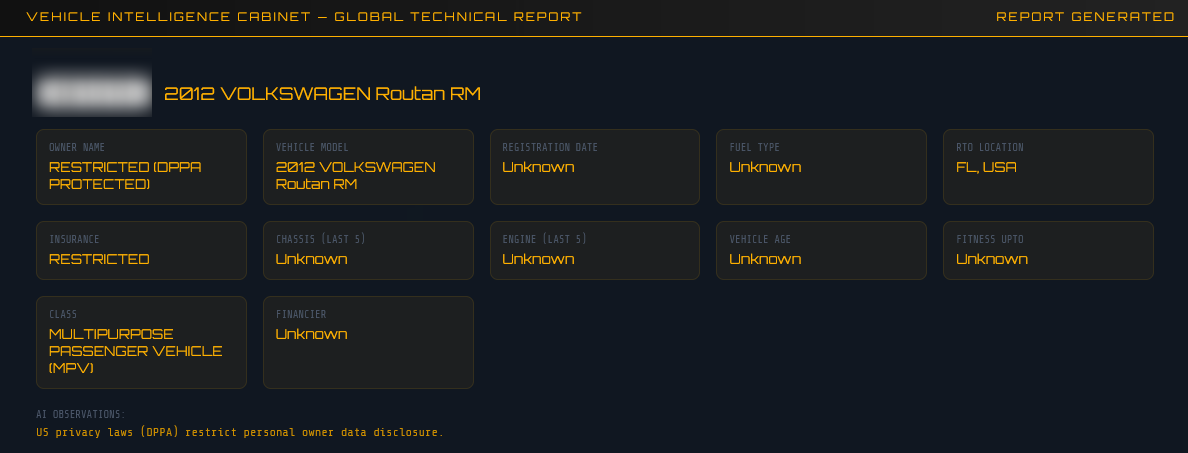
For US plates, owner data is legally restricted under the Driver’s Privacy Protection Act (DPPA), so the node focuses on vehicle technical intelligence instead:
| Field | What’s Available |
|---|---|
| Make / Model / Year | ✅ Full detail |
| VIN Descriptor | ✅ Partial VIN |
| Fuel Type | ✅ |
| Vehicle Class | ✅ |
| Engine Displacement | ✅ |
| Safety Systems | ✅ (ABS, ESC, TPMS, Traction Control) |
| GVWR | ✅ |
| Assembly Plant | ✅ |
| Owner Name | ❌ DPPA Restricted |
The node flags any technical alerts or recall notices found on the page as well.
In cases where structured scraping is insufficient (e.g., insurance snippets in search results, resale listings), the node falls back to the qwen3:8b LLM with a specialised RTO analyst prompt:
You are an expert RTO OSINT analyst. Extract:
owner name, vehicle model, registration number,
registration date, fuel type, RTO location,
insurance details, chassis/engine numbers.
Return valid JSON only.
The result from either the scraper or LLM is stored in vehicle_records in the agent state, and the deduplication reducer (_merge_vehicles) ensures the same plate is never double-counted across iterations.
The Forensics Lab is an independent feature within the web UI that analyses uploaded files for hidden metadata — the kind that can reveal far more than the file’s visible content.
| File Type | Extensions | What’s Extracted |
|---|---|---|
| Images | JPG, PNG, TIFF, BMP, WEBP | EXIF data, camera info, GPS coordinates |
| Author, creator, title, keywords, creation/modification dates, page count | ||
| Word Documents | DOCX | Author, last modified by, revision count, word count, creation/modification dates |
Photos taken on smartphones almost always carry EXIF metadata embedded silently in the file. The Forensics Lab uses Pillow to extract all EXIF tags:
exif_data = img._getexif()
for tag_id, value in exif_data.items():
    tag_name = TAGS.get(tag_id, str(tag_id))  # human-readable tag name
    metadata["fields"][tag_name] = value
Commonly found fields include:
Make / Model — the exact camera or phone model (e.g., Apple iPhone 15 Pro)DateTime / DateTimeOriginal — when the photo was actually takenSoftware — editing software used (e.g., Lightroom 7.2)GPSInfo — latitude and longitude of where the photo was taken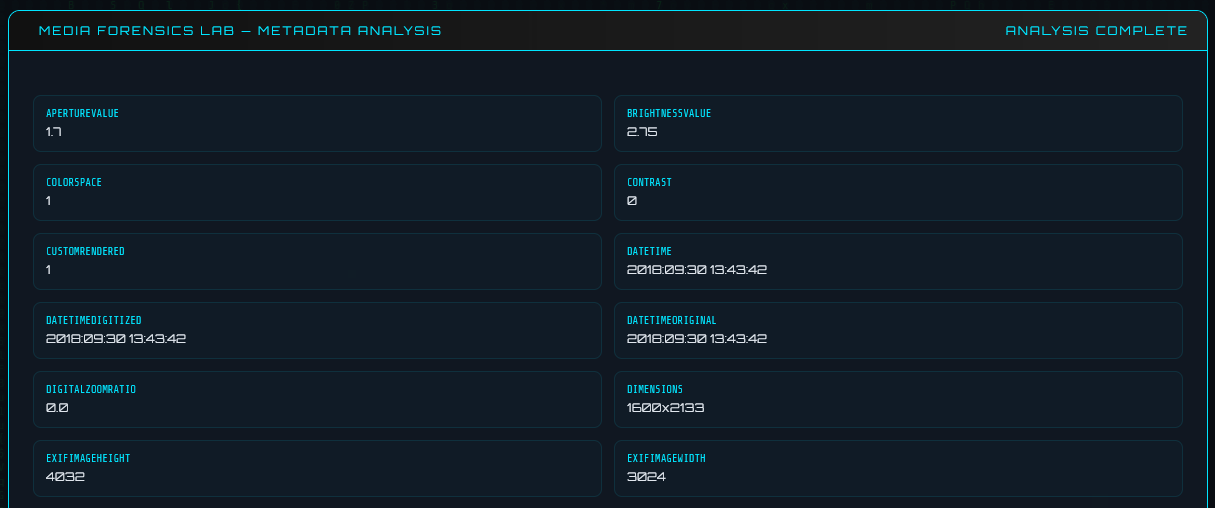
GPS data in EXIF is stored in DMS format (Degrees, Minutes, Seconds). The lab converts it to decimal coordinates for direct use in maps:
def _dms_to_decimal(dms_tuple, ref):
    degrees = float(dms_tuple[0])
    minutes = float(dms_tuple[1])
    seconds = float(dms_tuple[2])
    decimal = degrees + minutes / 60.0 + seconds / 3600.0
    if ref in ("S", "W"):
        decimal = -decimal
    return round(decimal, 6)
If GPS data is found, the UI displays the coordinates and a direct Google Maps link — pinpointing exactly where a photo was taken.
Most people don’t know their files are talking. A photo posted online, a PDF submitted to a form, a Word document shared via email — all of them carry silent metadata that can reveal:
The Forensics Lab makes this visible in seconds through a simple drag-and-drop interface.
1. Local LLM, no cloud dependency
Using Ollama means the agent runs entirely offline. No API costs, no data leaving your machine. The qwen3:8b model was chosen for its strong instruction-following and JSON output capabilities.
2. Strict identity matching as a guardrail
The 3-character prefix check sounds crude, but it’s effective. It prevents the LLM from pivoting to a completely different person just because they share a common name. You could replace this with something more sophisticated (fuzzy matching, vector similarity) for a production system.
3. Relevance scoring before harvesting
Maigret can return hundreds of results. Only profiles scoring ≥ 0.2 relevance and up to the top 12 are passed to the Harvester. This keeps each iteration fast and focused.
4. Reducers for clean state accumulation
The custom _merge_* reducers mean nodes don’t need to worry about the accumulated state — they just return their new data. LangGraph merges correctly. This keeps each node simple and testable in isolation.
5. Graceful fallbacks everywhere
Maigret → HTTP fallback. ChatOllama → direct httpx fallback. Primary DDG library → secondary import. The agent keeps running even if individual dependencies are missing or fail.
LangGraph is excellent for iterative, stateful agents. The reducer pattern eliminates a whole class of bugs around state accumulation that I would have had to manage manually.
Local LLMs are surprisingly capable for structured extraction tasks. qwen3:8b reliably returns valid JSON from my prompt template. Temperature 0.1 is key — you want determinism, not creativity, for structured output.
OSINT tools need careful noise filtering. Without the identity-match guardrail, the agent spiraled off to investigate unrelated people early in testing. The LLM is powerful but not magic — you need heuristic guards around its outputs.
Threading + SSE is a great pattern for long-running agent UIs. Spawning the agent in a background thread and streaming results via SSE gives a much better UX than waiting for a response on a single HTTP request that might take minutes.
This project started as a curiosity — “what if I automated the recursive loop of OSINT research?” — and turned into a genuinely useful tool for understanding your own digital footprint.
The combination of LangGraph’s graph-based orchestration, Maigret’s breadth of platform coverage, and a local LLM for intelligent pivot decisions produces something more capable than any of those parts alone.
If you build on this, I’d suggest exploring:
- Async execution in Scout/Harvester for faster parallel scraping
- Vector similarity for better identity matching across aliases
- More data sources — Shodan, Certificate Transparency logs, WHOIS
- Export formats — PDF, HTML, JSON alongside Markdown
The digital shadow you cast online is larger than most people realise. Tools like this help bring it into focus.
Built with Python, LangGraph, Ollama, and too much curiosity.